The hottest days don’t have to mean the highest bills. Today’s air conditioning has quietly evolved from simple on-off boxes into smart, finely tuned systems that match cooling to your home’s real needs. Variable-speed compressors, inverter-driven heat pumps, and intelligent controls can trim wasted energy while keeping rooms consistently comfortable.
This article looks at how those technologies work, which features actually matter, and what practical steps lower consumption without sacrificing comfort. If you’re currently researching or considering installing an air conditioner in the UK, whether you’re upgrading an old unit or trying to get more from the system you have, you’ll find clear guidance on sizing, zoning, settings, maintenance, and integration with smart thermostats and utility programs. The goal is straightforward: use less energy to achieve the same or better comfort, season after season.
Table of Contents
- Choose inverter technology and high SEER efficiency to lower baseline energy use
- Proper sizing and zoning to align capacity with room loads and occupancy patterns
- Smart controls that cut runtime through schedules sensors and gentle setpoint shifts
- Installation and maintenance essentials from duct sealing to airflow balancing and clean filters
- In Retrospect
Choose inverter technology and high SEER efficiency to lower baseline energy use
Inverter-driven compressors ramp up and down instead of slamming on and off, trimming the steady “idle” wattage your system draws through most of the day. By matching output to the room’s exact load, they prevent energy spikes, hold steadier temperatures, and reduce wear on parts. You’ll notice fewer drafts, quieter operation, and a more consistent feel even when outdoor conditions swing. Pairing this modulation with a variable-speed indoor fan further smooths airflow, unlocking lower baseline consumption without sacrificing comfort.
- Smoother output: minimizes hard starts, slashing peak draw
- Better part‑load efficiency: saves kWh during 70-90% of runtime
- Stable comfort: tight temperature bands and lower humidity
- Quieter nights: lower compressor and airflow noise
- Longer life: fewer cycles and gentler operation on components
| System | Typical SEER/SEER2 | Est. Bill Cut | Best Fit |
|---|---|---|---|
| Fixed‑speed split | 14-15 | Baseline | Mild use, low upfront |
| Inverter split | 17-19 | 15-30% | Mixed climates |
| Inverter + high SEER | 20-25+ | 25-45% | Hot/humid, heavy cooling |
For efficiency ratings, aim for a high SEER (or SEER2) model that suits your climate and usage. In warm regions or long cooling seasons, stepping from ~15 to 20 SEER can shave 25-35% off cooling costs; on a $120/month summer bill, that’s roughly $300-$500 saved per year, often paying back in 3-5 years with rebates. Check the AHRI certificate for verified ratings, prioritize a DC inverter compressor with a variable‑speed blower, and right‑size the system to your home’s load. Small setup choices-tight ducts, clean filters, smart thermostat setbacks-let high‑efficiency hardware deliver its full promise, keeping everyday energy use low without compromising comfort.
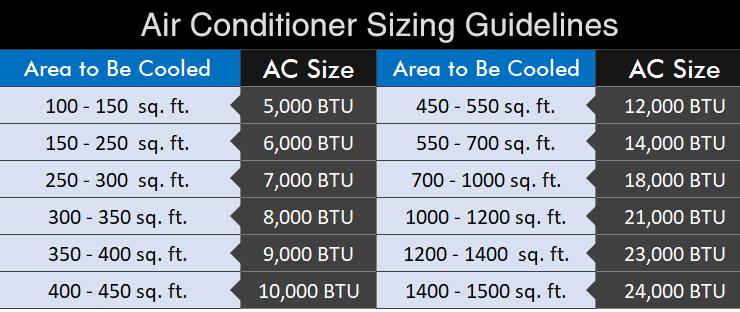
Proper sizing and zoning to align capacity with room loads and occupancy patterns
Right-sized systems sip power because they match output to what each room actually needs. That starts with a room-by-room load calculation (think: insulation, glazing, orientation, people, and appliances), not a quick square‑foot guess. Bigger isn’t better: an oversized unit short‑cycles, wastes energy, and leaves sticky air; an undersized one runs forever, overheats coils, and still misses the setpoint. Pairing variable‑speed compressors and ECM fans with the right coils lets your system modulate smoothly, delivering just enough airflow and refrigerant for the current sensible/latent mix-quietly, efficiently, and without drama.
- What to measure before you buy: room square footage, R‑values, window SHGC/U‑factor, air leakage, solar exposure, occupancy patterns, internal heat gains.
- Red flags of poor sizing: fast on/off cycles in mild weather, humidity above 60%, uneven rooms, whooshing vents (high static), and musty smells.
- Pro tip: target balanced airflows and ducts sized for quiet, low-static operation-no bypass dampers; let the blower manage static automatically.
Zoning directs comfort and capacity where people actually are. Split the home into a few smart zones-daytime living, sleep spaces, and seldom‑used areas-and control them with room sensors, motorized dampers, or multi‑split heads. Use schedules, occupancy detection, and geofencing so empty zones drift to wider setpoints while active areas get precision conditioning. The result: steadier temperatures, tighter humidity, lower fan speeds, and real savings-often 15-30%-because you’re not conditioning empty cubic footage. Keep returns available in every zone (or use transfer grilles) to prevent pressure imbalances and maintain clean airflow paths.
| Zone | Typical Setpoint | Active Hours | Capacity Share |
|---|---|---|---|
| Living Areas | 23-24°C (comfort) | 08:00-20:00 | ~50% |
| Bedrooms | 20-21°C (sleep) | 20:00-07:00 | ~35% |
| Office/Flex | 24-26°C (on‑demand) | As needed | ~10% |
| Spare/Utility | 26-28°C (drift) | Rare | ~5% |
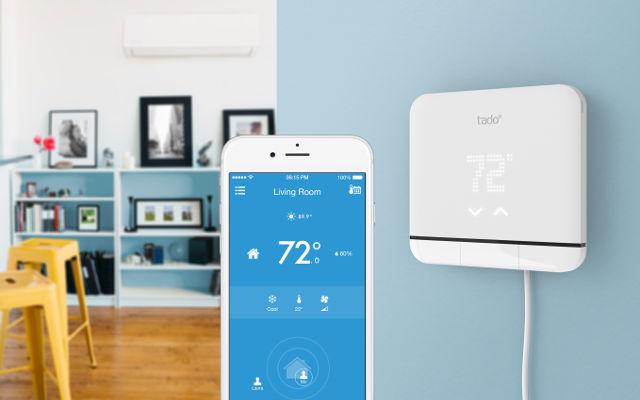
Smart controls that cut runtime through schedules sensors and gentle setpoint shifts
Modern thermostats and AC controllers get thrifty by matching cooling to real life. With smart schedules that mirror your week, sensors that know when rooms are empty, and gentle setpoint nudges that most people won’t notice, your system runs less without sacrificing comfort. Think pre-cooling before the heat peaks, then coasting; widen the temperature deadband slightly when humidity is under control; and let adaptive learning trim runtime during predictable low-activity hours.
- Set smart blocks: Weekday vs. weekend schedules with a brief pre-cool before peak heat, then ease back in the afternoon.
- Use occupancy and window sensors: Auto-away when no one’s home; pause cooling if a window/door is left open.
- Geofencing: Start cooling just before you arrive so the system isn’t idling all day.
- Humidity-aware control: Widen the comfort band when air is dry; tighten it slightly when muggy.
- Fan-first strategies: Run fan-only for night flushes or after sunsets; pair with ceiling fans for perceived cooling.
- Room zoning: Prioritize occupied spaces, let seldom-used rooms float a bit warmer.
| Setpoint Nudge | Comfort Tip | Typical Runtime Cut |
|---|---|---|
| +0.5°C | Usually unnoticeable | Small but steady |
| +1.0°C | Add ceiling fan on low | Moderate |
| +1.5°C | Use dehumidify mode | High (varies) |
Start with tiny adjustments and let your system learn: a half-degree nudge, a two-hour eco block after school or work, and auto-away enabled. Revisit once a week, then seasonally, to refine setpoints and schedules. By combining subtle temperature shifts with occupancy smarts and fan assist, you’ll trim compressor hours-the most energy-hungry part of cooling-while keeping rooms feeling just as comfortable.
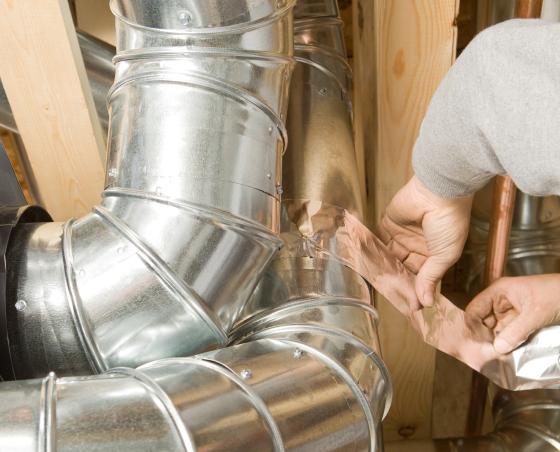
Installation and maintenance essentials from duct sealing to airflow balancing and clean filters
Savings start on day one with a system that’s properly sized, sealed, and commissioned. Ask your installer to perform a Manual J load calculation, design the ductwork per Manual D, and seal all joints with mastic or UL 181-listed tape. In unconditioned spaces, insulate ducts and the refrigerant line set, set blower airflow to ~350-450 CFM/ton, and verify total external static pressure. Fine‑tune comfort by balancing supply and return paths so rooms aren’t over‑ or under‑served, check refrigerant charge via superheat/subcool, and place the thermostat away from heat sources and direct sunlight to prevent short cycling.
- Duct integrity: Pressure test and seal to minimize leakage and hot/cold spots.
- Airflow balancing: Adjust dampers and registers; confirm room‑by‑room targets.
- Refrigerant charge: Measure, not guess-charge affects both efficiency and longevity.
- Drainage and safety: Proper trap, slope, and float switch to protect against water damage.
- Controls setup: Configure staging, fan profiles, and schedules for your lifestyle.
Keeping the system clean and breathing freely protects the investment and trims kilowatt‑hours all year. Replace or wash air filters every 1-3 months (MERV 8-11 suits most homes), and watch pressure drop if you upgrade filtration. Rinse outdoor coils each spring, clear vegetation within 24 inches, and periodically clean the evaporator coil and condensate line to prevent biofilm. Before peak seasons, have a pro verify fan speed, electrical connections, and sensors, then calibrate your smart thermostat and review run‑time/energy reports to spot drift early.
| Task | Frequency | Energy Edge |
|---|---|---|
| Replace filter (MERV 8-11) | Every 1-3 months | Lower fan load |
| Clean outdoor coil | Annually (spring) | Improved heat transfer |
| Flush condensate line | 2-4× per year | Prevents shutdowns |
| Check static pressure | Annually | Optimized airflow |
| Thermostat calibration | Annually | Accurate setpoints |
In Retrospect
In the end, trimming your energy bills with modern air con is less about one silver bullet and more about a well-tuned ensemble: efficient hardware, smart controls, airtight ducts, and steady maintenance working in quiet concert. Right-size the system, compare seasonal efficiency ratings, consider zoning or heat pump options, seal and insulate, and let simple habits-realistic setpoints, clean filters, closed blinds on hot afternoons-do their part.
If you’re planning an upgrade, start with a load calculation, gather a few quotes, and check local rebates or time-of-use rates. The goal isn’t just cooler air; it’s a system that uses only what it needs, when it’s needed. Do that, and you’ll notice the difference where it counts-comfort that stays steady, and bills that speak a little softer, season after season.